Sunday, July 29, 2012

Scale Modeling: Choosing your first kit-specific considerations.

After evaluating the general considerations in choosing your first kit/s (see Scale Modeling: Choosing the First Kit- General Considerations) which can be applied to all types of models, there are some considerations specific to the type of subject kit you will eventually select.

1. Armor/Military Vehicles.

For the first few builds it best to avoid models with windscreens.  For newbies or even those already into the hobby, these clear parts are usually difficult to get right being made of brittle plastics which are easy to scratch or break and difficult to repair. Another newbie waterloo are military vehicles showing much interior like open topped vehicles (jeeps, half-tracks, etc.). Interior detailing takes a lot of getting used to skills wise especially challenging for a beginner. It would be best to learn first to build, paint and detail the exterior at the onset and then to challenge yourself to do the same for the interiors moving forward with your upcoming kits. It is also good advice to avoid the initial complexity of tank tracks for your first few builds and maybe try to consider wheeled vehicles first just to get the hang of it first.

This Trumpeter LAV-25 is an ideal first time armored vehicle kit generally devoid of clear
parts and  any tracks making it easier for the beginner than most armoured vehicles.

2. Aircraft
The issue on clear parts also applies to aircrafts mostly the cockpit canopy in general. It is actually especially more difficult in some aircraft types like helicopters described in one article as “glasshouse with wings”! Aircraft have clear parts, namely.  Sometimes its not only a matter on having difficulty in getting the clear parts right but there can be concerns on the fit of the clear part itself which are not that easy to fix for a newbie.  
Other newbie concerns on aircrafts are fixing wing misalignments and the paint finishing itself as it would be difficult to get to and simulate the bare or shiny metal finish on some which would be better handled once you build up more on your skills.
Note this  "glasshouse with wings" Gazelle helicopter by Heller; a definite challenge for a newbie.

3. Ships
Again, these subjects are not recommended as first time kits beginners. Among other things, main challenges for these subjects for beginners are the details of very small parts for larger ships (e.g. a battleship in 1/700th scale) and the different colour scheme challenges specially considering above and below the waterline. In addition, the riggings of the sails itself needs getting used to which can be a source of early frustration for someone new to the ship models. 
New Forces Of Valor 1:700th Scale German Battleship Tirpitz - Normandy 1944;
see the detailing challenges  this may bring to a beginner.
4. Cars / Motorbikes
Generally, these subject types are not recommended also for beginners in the craft. Apart from the same concerns on clear parts as above, additional challenges await a beginner in the hobby trying cars/motorbikes for the first time: parts made of different materials (rubber or vinyl tires, plastic tubes, chromed parts, etc.); complex paint scheme; more decals, etc.

Tamiya Toyota Soarer 3.0GT Limited model car kit 1/24; the different materials
used and complex paint scheme; more decals, etc.; may be a challenge for newbies


PREVIOUS RELATED POSTS:


NEXT:


Tags: , , , , , , , , , , , , , , , , , , , , , , , , , , , , , , , , , , ,

Saturday, July 28, 2012

Scale Modeling: Choosing the First Kit- General Considerations.

I always thought that building scale models was only kid’s stuff and that going into this hobby head on, especially as a late bloomer, would just be a walk in the park: buy kits-build/paint-display. Done.
Of course THIS scale modeling is NOT kidstuff.... :-). Just wanted to post this one
from Tinselman for effect and to get your attention:  Soviet Era Moscow, photo by Natalia Grishkina © 
Well…it’s turning out to be more than that. Don’t get me wrong. I’m not saying that it’s difficult and fun. Actually it’s much more fun than I expected. What I did not expect was that it was “deeper” than what I thought it would be. In reality, you can go into the craft at whatever level of enthusiasm you want and still enjoy it. This may be the reason why the appeal crosses all ages. For me, I am a bit geeky and enjoy technical stuff so that’s what I bring going into scale modeling. I crave not only building things with my hands but also enjoy the peripheral stuff like the history behind the models I build which can be of use especially when going into the details of the kit itself or making a diorama for it.
Talk about details! A one-third scale model of an Aston Martin DB5 used in the filming of the Bond movie Skyfall 

So how did I choose what my first kit would be? The following are the general factors that I considered:

1. Cost
The price of scale models kits can vary depending on many factors. One common advice I heard was not to spend too much on your first kit/s as there is a good chance that your first models may not come out as expected (unfinished, better kept than displayed, etc.) depending mostly on your initial experiences and much on your temperament- as a newbie anything can happen with your first toys.
Since your first kit may turn out not as envisioned, it is important to set personal expectations very early. A lot of mistakes should be expected from building to painting the first few models so it would be best to treat this as a learning process and to experiment with different techniques and skills at the onset. In short, it would not matter much if the results are not too good if you work on cheaper models first. It is better not to expect to build good models with your first few builds, so do not spend too much money on them.

2. Size and Scale
It is common sense to start modeling with small models and that generally means choosing a small scale.

3. Complexity
Newbies should start with kits that do not have many parts and that use only injection molded polystyrene.  First gain the skills of working with plastic before moving on to other media (photo-etched brass, resin) that require different glues and skills.
Photo Etched parts
There will be plenty of time later to develop skills with different media moving forward.  

4. Quality
It is wise for beginners to avoid older kits and stick with recently released models from mainstream quality manufacturers. Though modellers expect parts to fit together well with very little need for fillers, this has not always been the case especially with those released decades ago.  You can challenge yourself later on with these older kits when you are much better equipped skills wise but it would be best to get more recently released higher quality and simple kits at the same time. Reviews in modeling magazines and on the Internet can help you out with this search. 

5. Subject
Simply put, build models that you like. For whatever reason one has, enthusiasm will always be the key in choosing the subject for the kit. The interest for the kits would make the big difference if the kit project you will choose will eventually become a chore that you will loose interest on or a passion you will find time to finish and enjoy.

6. Paint Scheme
It is a common advice to start with your first few models with fairly simple and bland single colour paint schemes. It can dampen a beginner’s enthusiasm to complete the build of a model only to be ruined and disappointed by a difficult color scheme. You can always progress to more complicated color schemes once you build your skill and confidence moving forward.
Tamiya Focke Wulfa has a gorgeous paint scheme, but the soft-edged and 
mottled camouflage effect can only be done well with the expert use of a quality airbrush.


PREVIOUS RELATED POSTS:


NEXT:


Tags: , , , , , , , , , , , , , , , , , ,

Monday, July 23, 2012

Scale Modeling: Making a Portable Modeling Workstation

Though this topic was posted in this blog way ahead of my entries on my first completed scale model, this project was actually conceived only after my first three armor models were done. The decision to build a workstation actually came when I already had my initial batch of tools and with the realization that working with miniatures does not necessarily mean that I can just set it up anywhere in the house. I initially thought that building small scale models would require only a small space which I can just set up anywhere whenever and wherever inspiration strikes me to pursue the hobby.

Scale Model Workstation sample -beauty and madness (chaos)! This is not mine of course (just saw all over while browsing so I dont know who to attribute it to-sorry for that)-but would GLADLY have one- space, chaos and ALL!
Well…I was wrong. What happened was that the hobby took over the working and daily living spaces of my wife and kids. The only practical available spaces were the dining area, library room table and the bedroom of the kids and that limited my work to the times these areas were free. Whenever my family had to do their own thing, I had to put a cover over my stuff and transfer and make several trips to where I will relocate to bring out my current model, tools, lamp etc…..and where not talking about painting yet! If I needed to do so, I would have to bring out paints, brushes, bottles, fill up containers with water, grab kitchen towel and so on.

The result- scale model chaos all around the house! What was thought of as small space requirement for miniature projects started taking over the house! At the end of a hobby day, the temporary hobby areas would be strewn with tools and bits of models which would more often than not be lost once relocated. Careful relocations would constantly waste my time and usually takes the fun out of the craft.
Since I can’t build a separate hobby room for me at this point in time, I had to improvise considering the small space and the inability to have a permanent set up. The solution was to build a portable modeling workstation with the primary objective of having the ability to start and stop modeling within a few minutes anywhere around the house. I still managed to take over a small space in my kid’s room (see Spray booth post) but still decided on a portable workspace for model building which would address not only the relocation issues (if still necessary to move) and the mess mentioned above,  but also give me more work flexibility. I plan to even bring my basic stuff when I travel to my house in the province!
The plan was a DIY project using scrap wood and other left over items around the house to keep the cost to a minimum. Instead of scrap wood, I chanced upon this wooden model kit display box in one of the malls. It was a wooden display box with compartments for displaying built kits with a sliding clear acrylic plastic sheet as cover/door.


Then, inspiration struck me…… why not buy two of these, put a hinge in between them, a door latch to join the two on the other end and a handle on top… and ..voila!
A portable modeling workstation!

The two wooden Model Display Boxes.
Note the sliding clear acrylic doors.

Door latch
Hinge and cabinet door handle on top
                                         
Closed….
Open…..
I managed to store my paint bottles and accessories in the different compartments as well as all of my basic tools. I was able to etch out also some slots in the wood separators to accommodate the paint brushes.


Done!


Simple…but it works for me….
Tags: , , , , , , ,

Saturday, July 21, 2012

BASIC Digital Photography Glossary: A to F

Basic Digital Photography Glossary: A to F

graphic from basic-photography-tips.com
For me to have a better understanding of this hobby before I try it out (and buy expensive equipment!) I went on with my usual research to learn more about it. The best way to start is to have a ready reference for the usual terms I have already encountered and surely will encounter more.

This glossary is lifted mostly from http://www.dummies.com http://www.thephoblographer.com/ and other sources which I found very useful. The list is mostly from the dummies.com as I believe this glossary is a more concise and compact reference for beginners likes me. I added some definitions from other sources also to some terms to try to simplify it further.

A


adapter: Device used to attach certain lenses or filters to your digital camera.

Adobe Photoshop: The leading professional image-editing program for your computer.
Adobe Photoshop Album: A program that enables you to view one or several of your images at the same time, all in one easily navigated workspace.
Adobe Photoshop Elements: A less expensive version of Photoshop with fewer of the ultra-high-end features the professional version includes.

anti-aliasing: A process that smoothes the rough edges or jaggies in images by creating partially transparent pixels along the boundaries that are merged into a smoother line by our eyes.

aperture: An opening made by an adjustable diaphragm, which permits light to enter the camera lens and reach the image sensor;  http://entry-level-dslr-camera-review.toptenreviews.com/basic-digital-slr-definitions.html it is the physical size of the hole through which light passes to reach the sensor. Aperture is usually expressed using F/stop values. The smaller the value is, the larger the opening of the lens.

aperture-priority autoexposure: A semi-automatic exposure mode; the photographer sets the aperture, and the camera selects the appropriate shutter speed to produce a good exposure.

Auto mode: A digital camera mode in which both the aperture and shutter speed are set automatically.

auto shut-off: A digital camera feature that turns off the camera after a certain time period of inactivity.

autoexposure: A feature that puts the camera in control of choosing the proper exposure settings.

autofocus: A camera setting that allows the camera to choose the correct focus distance for you, usually based on the contrast of an image or set by a mechanism, such as an infrared sensor, that measures the actual distance to the subject.

B


backlighting: A lighting effect produced when the main light source is located behind the subject. Backlighting is also a technology for illuminating an LCD display from the rear, making it easier to view under high ambient lighting conditions.

barn doors: Attachments for flash devices that feature movable flaps, which allow you to finely tune light output.

battery charger: A device that recharges rechargeable batteries by connecting to a power source.

battery pack: A device that holds multiple batteries with which you can power your digital camera.

bit depth: Refers to the number of bits available to store color information. A standard digital camera image has a bit depth of 24 bits. Images with more than 24 bits are called high-bit images.

blown out: Term to describe an image or part of an image that’s over-exposed with no detail.

BMP: A Windows bitmap file format; the default graphic created by Windows graphics programs.

bokeh: The quality of the out-of-focus areas of an image that a lens produces. See "100+ Beautiful Examples of Bokeh Photography" for more examples.
 and example of bokeh by Gege
bracketing: Taking a series of photographs of the same subject at different settings to help ensure that one setting will be the correct one.

shooting mode: Range of options that gives you limited or total control of picture-taking settings.

buffer: A digital camera’s internal memory, which stores an image immediately after it was taken until the image can be written to the camera’s memory or a memory card.

Bulb: Shooting mode in which the shutter stays open so long as the shutter button is fully depressed.

burst mode: A special capture setting, offered on some digital cameras, that records several images in rapid succession with one press of the shutter button. Also called continuous capture mode.

C


camera backpack: A variation on the camera bag that you strap across your back.
camera bag: A portable container for your camera and any additional photography equipment (such as lenses and extra batteries).

camera dolly: A kind of wagon that lets you roll your camera/tripod rig back and forth, as needed.

capture resolution: The resolution of an image that you take with your digital camera.

card reader: A device into which you insert a digital camera’s memory card, then attach to your computer to make that memory card appear as just another drive to your computer.

CCD: Short for charge-coupled device. One of two types of imaging sensors used in digital cameras.

center-weighted metering: Metering mode that reads the entire scene but gives more emphasis to the subject in the center of the frame.

clone source: The area of a digital image that you want to clone.

cloning: The process of copying one area of a digital photo and “painting” the copy onto another area or picture.

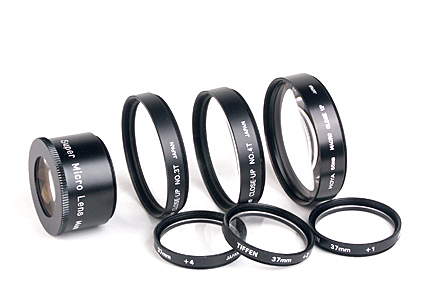
close-up lens: A lens add-on, resembling a filter, that allows you to take pictures at a distance that is less than the closest-focusing distance of the prime lens alone.
The front row, left to right, shows a Tiffen 3-lens set of +4, +2 and +1 (37mm). The back row, left to right,
has a Raynox MSN-500 Super Micro (37mm and 28mm), Nikon #3T +1.5, Nikon #4T +2.9, and a Hoya +10 macro
close-up lenses. The Nikon #3T and #4T are only available in 52mm thread, and #5T and #6T in 62mm thread.

CMOS: Pronounced see-moss. A much easier way to say complementary metal-oxide semiconductor. A type of imaging sensor used in digital cameras; used less often than CCD chips.

CMYK: The print color model in which cyan, magenta, yellow, and black inks are mixed to produce colors.

color cast: A tinge of color that discolors your image in whole or in part.

color saturation: The purity of color; the amount by which a pure color is diluated with white or gray.

composition: The arrangement of the main subject, other objects in a scene, and/or the foreground and background.

compression: A process that reduces the size of the image file by eliminating some image data.

Continuous Auto-Focus : A mode in which the camera updates focus when the subject moves as long as you continue pressing the shutter button halfway.

Continuous Drive: A mode in which the camera continues taking pictures as long as you press the shutter button.

contrast: The range of difference in the light to dark areas of a photo.

convergence: An image distortion that makes vertical structures appear to lean toward the center of the frame.

Corel Paint Shop Pro (PSP): An image-editing program that allows you to do all the standard image-editing activities and includes photographer-quality tools.

Corel PhotoImpact: An easy-to-use image-editing program that includes basic fixes and guided projects.

Corel Photo-Paint: An image-editing program with a fairly comprehensive set of retouching tools, but it’s not quite as tool-rich as Adobe Photoshop or Photoshop Elements. It comes as a part of the CorelDRAW graphics suite.

CorelDRAW: A bundle of image-editing software (described as a graphics suite). It includes tools for vector illustration and page layout, photo editing, and bitmap to vector tracing.
crop: To trim an image or page by adjusting its boundaries.

D


defraction: The breaking up of a ray of light into dark and light bands or into the colors of the spectrum, caused by the interference of one part of a beam with another.

depth of field: The zone of sharp focus in a photograph. This refers to how much of the image is in focus. Deep depths of field will generally allow everything to be in focus while a shallow depth of field will only have smaller portions in focus.
The area within the depth of field appears sharp, while the areas in front of and beyond the depth of field appear blurry.
from en.wikipedia.org/wiki/Depth_of_field

diffusion screen: A thin screen-like material that diffuses or softens a light source’s illumination.

digital zoom: A feature offered on most digital cameras; crops the perimeter of the image and then enlarges the area at the center. Results in reduced image quality.

diopter adjustment: A viewfinder feature that corrects for common eyeglass prescriptions so eyeglass wearers can use the viewfinder without wearing their glasses.

downsample: Remove pixels from a digital image.

DPOF: Stands for digital print order format. A feature offered by some digital cameras that enables you to add print instructions to the image file; some photo printers can read that information when printing your pictures directly from a memory card.

drive mode: Setting that determines whether a camera takes a single picture or a series of pictures.

DVI interface: Digital Video Interface. A specification to accommodate analog and digital monitors with the same cable.

dye-sublimation printer: A type of printer that uses a printing technique in which inks are heated and transferred to a polyester substrate to form an image.

E


edge: An area where neighboring image pixels are significantly different in color; in other words, an area of high contrast.

EXIF: Exchangeable Image File Format. Developed to standardize the exchange of image data between hardware devices and software.

exposure: The amount of light allowed to reach the film or sensor, determined by the intensity of the light, the amount admitted by the iris of the lens, and the length of time determined by the shutter speed.                   
It is the amount of light that is collected by the camera’s sensor. Exposure is similar to f/stops in that it refers to the relationship between shutter speed and aperture.
At each point of the triangles lies one of the critical components that comprise a correct exposure:
ISO: This is the numeric value assigned to the sensitivity level of your camera sensor
Aperture: The opening of your lens, which controls the volume of light entering the camera
Shutter Speed: This controls the length of time that light is allowed in through the lens
exposure compensation: A setting used to increase or decrease the exposure manually when the camera gets it wrong.

exposure value (EV): EV settings are a way of adding or decreasing exposure without the need to reference f-stops or shutter speeds. For example, if you tell your camera to add +1EV, it will provide twice as much exposure by using a larger f-stop, slower shutter speed, or both.

extension tube: A camera attachment that moves your camera lens farther from the sensor, enlarging the image captured by the camera. Also called a lens extender.

eyepoint: The distance your eye can be from the camera viewfinder’s window and still see the entire view.

F


fanny pack: A small bag worn around the waist like a belt.

fastening point: A position, represented by a square, where an image-editing program anchors a magnetic selection outline.

feather: To fade the borders of an image element so that it blends more smoothly with another layer.

file format: A way of storing image data in a file.

fill flash: Also called forced flash. A camera setting that causes the electronic flash to always fire, which produces the effect of filling in shadows in brightly illuminated images.

filter: In photography, a device that fits over the lens, changing the light in some way. In image editing, a feature that changes the pixels in an image to produce blurring, sharpening, and other special effects.

flash: A device on your camera that fires a burst of light when you take a picture to illuminate your subject.; On your camera, this is typically characterized by the lightning bolt symbol;two examples.
          Fill Flash- light that will just fill in any dark spots.
          Red Eye- flash that will prevent red-eye from showing up.


flash bracketing: Capturing a series of photos, each with a different exposure, by pressing the camera’s shutter button once.

focal length: The distance between the film and the optical center of the lens when the lens is focused on infinity, usually measured in millimeters.
Different focal lengths don't just magnify the shot, but give a different look to it. The image
below shows how different focal lengths can give the illusion of a different distance between to objects.
focus: To adjust the lens to produce a sharp image-
It is what the camera is mainly trying to take a picture of. It is what appears in the green boxes on your camera’s LCD point and shoot. For a DSLR, it is literally what can be clearly and sharply seen in the depth of field. The larger your F stop (f1.8) the less will be in focus. The out of focus area is called, “bokeh” and can deliver some beautiful results.

Type of focusing modes:
     Macro, which is anything really up close about a couple of inches or even less. (seen as a flower symbol)
     Infinity, which is for very, very far away objects. (seen as a mountain symbol)
     Normal, which is generally everything in between Macro an Infinity.

Beyond this there is also:
     Auto-focusing which lets the camera focus for you.
     Manual-focusing which enables you to do all the focusing.

There are also in-between modes depending on the type of lens and who made it:
     Single focus- Which will auto-focus on one stationary subject.
     Single/Manual- Same thing but allows for manual touch up.
     Continuous focus- which will continuously focus on one spot or subject as you are moving.
     Continuous/Manual- Same thing but allows for manual touch up
     Tracking Focus- Which will continuously focus on one subject as it moves.

framing: In photography, composing your image in the viewfinder. In composition, using elements of an image to form a sort of picture frame around an important subject.

front curtain sync: The default kind of electronic flash synchronization technique. The flash fires at the beginning of the exposure — in the instant that the first curtain of the focal plane shutter finishes its movement across the film or sensor plane.

f-stop: Refers to the size of the camera aperture. A higher number indicates a smaller aperture. Written as f/2, f/8, and so on.
from digicamhelp.com
Perhaps the most misunderstood term in photography. F/stop refers to the relationship between the aperture of the lens and the shutter speed. In order for enough light to reach the camera’s sensor, both the aperture and shutter speed must be set properly. Without a meter, it is almost impossible to determine which settings to use. In most cases it is best to let the camera determine these settings for you.

FTP: File Transfer Protocol. A set of communication rules that allow data or files to be transferred between computers over a network.
Tags: , , , , , , , , , , , , , , , , , , , , , , , , , , , , , , , , , , , , , , , , , , , , , , , , , , , , , , , , , , , , , , , , , , , , , , , , , , , , , , , , , , , , , , , , , , , , , , , , , , , , , , , , , , , , , , , , , , , , , , , , , , , , , , , , , , , , , , , , , , , , , , , , , , , , ,

Thursday, July 19, 2012

My 1973 VW RESTORATION: Econo vs Standard Beetle


Now that I think I got the Super vs. Standard AND the German vs Brazilian beetle all figured out (I have a German Standard VW), another VW question was again hurled at me by local VW enthusiasts: do you have “Standard” or an “Econo” beetle? Just when I thought I’m done with the classification of my bug, here comes another category. It never seems to ends!

I surfed around for more information about this query but found difficulty gathering information on the “Econo” terminology. Only in my local VWCP forums did I see much discussion on it. It got me wondering if the “Econo” term is an internationally acceptable categorization or is it more local than anything else…I still welcome further clarifications on this topic from our international VW experts…

From my research on this topic and this series in general, it would appear that the VW beetle terminologies and classifications have been loosely applied not only in literature but more so in the net. Focusing more on this topic, we have clearly defined in my previous post on Standard vs. Super Beetles (My 1973 VW RESTORATION: Standard vs. Super Beetle) the definitions and structural differences between the two models:

     In gist, the Standard beetle (manufactured in Germany) is the original Beetle model using torsion bars for the front 
     suspension. This is the most common Beetle which evolved from the original Porsche design but was considered the 
     basic model- the Super Beetle the top of the line in Beetles. Super Beetles were introduced by VW as an upgrade from 
     the original model. Both models of the Super Beetle (1302 and 1303) use the MacPherson struts for suspension. This is 
     the main element making it different from the Standard Beetle. The other structural differences were mentioned in my 
     previous post.

Further readings on this topic revealed some literatures used the “Standard Beetle” term mostly more on the cosmetic aspects of the design as opposed to the structural aspects mentioned in the definition above. The Standard Beetle was described as a “stripped down” model of the Beetle without almost any body or window chrome trim.  The door handles, hood handles and front turn signal housings were painted, usually in grey.  These were sold primarily in Europe, but available in other markets such as Canada.  In the same line, the term Deluxe Beetle was also mentioned in comparison (primarily sold in the United States) with the familiar body and window chrome moldings, door and hood handles and chromed front turn signal housings.  To add to the confusion, with the introduction of the Super Beetle in the 1971 model year, the Deluxe Beetle which continued in production was informally called a “Standard Beetle” to differentiate between the two models and continued to have all of the “Deluxe” trim appointments. 

In the US when VW introduced the Super Beetle, they started calling the old car just "the Bug". The real "standard" or basic models were sold in other countries, but never in the US. They had different names depending on which country they were sold in. For example in Germany, it was sold as the "Sparkafer". I think in Canada a different but more basic model was labeled "Custom (correct me if I'm wrong) as opposed to "Deluxe". Australian Standards were called the Austerity models. In the Philippines, I believe they were popularly known as the Econo Beetle.

It would appear now that the term “Standard” beetle can be used to classify the bug either:
1. based on the basic structure- suspensions, etc. (Standard vs. Super Beetle model)
or…
2. based on cosmetics -chrome trimmings, etc.  (Standard vs. De Luxe Beetle version)

So where is the question on Econo Beetle vs Standard Beetle coming from? In one of the local forums I follow, the “Econo Beetle” is termed as a stripped-down version of the Standard beetle model.

Putting together all the information above, I came up with the following conclusions on the question of “Econo vs Standard” beetle:
1. On this question (not to confuse it with the structural Standard vs. Super Beetle model comparison above), focus should be more on the cosmetics.
2. The Econo and Standard classification is actually comparing the same model- the Standard beetle model (NOT the Super Beetles).
3. The “structurally” Standard Beetle model was classified into two versions “cosmetically”:
     a. Standard Beetle- “stripped down” model of the Beetle without almost any body or window chrome
        trim.  The door handles, hood handles and front turn signal housings were painted, usually in grey.
     b.Deluxe Beetle- with the familiar body and window chrome moldings, door and hood handles and
       chromed front turn signal housings.
4. With the introduction of the Super Beetle in 1971, the cosmetically Deluxe Beetle continued in production and was informally called a “Standard Beetle” to differentiate between the two models (Standard and Super) and continued to have all of the “Deluxe” trim appointments.
5. I believe that due to # 4.
     a. the cosmetically “Deluxe beetle” with all the trim appointments were named cosmetically “Standard
        Beetles” in general.
     b.The cosmetically “Standard beetle” which is “stripped down” without almost any body or window 
        chrome trim among other things was now termed (in the Philippines at least) as the Econo Beetle. The  
        same version may have been labeled differently per country like "Sparkafer"(Germany), "Custom”
       (Canada), Austerity models (Australia), etc.

6. The “Econo Beetle” is the cheaper version of the structurally Standard Beetle model without the usual enhancements and accessories of the DE LUXE version- hence more economical (cheaper).

Below are the original “Econo Beetle” specifications:
1200cc engine, single port
blade bumpers
Small taillights
Sealed beam front fenders 
Less chrome in general (no chrome strip front hood, etc.)
Painted vent window frames


1967 Canadian Custom

6 volt electronics
          Fun fact: The 12 Volt Electrical System was available as an option in Europe for the 1965 and 1966
          model year.  In the 1967 model year, it became standard and was introduced in the United States at
          that time.

Short headliner -Headliner upholstery is on the roof area only and does not extend to the inner pillars of the roof interior.


VW Standard: From a 1968 Hungarian brochure:


It would be rare now to see a “pure” Econo Beetle on the road due to numerous after Market accessories sold not to mention that Beetles bought directly from the dealers are already customized from its original basic factory state to increase the price or as requested also by the buyer.


My bug:

I was a bit confused in coming up with the Econo vs Standard classification of my bug because of the dealer customizations mentioned done when it was bought.

My 1973 Standard German beetle specs:


Painted vent window frames
Short headliner
1300cc engine, single port
Europa bumpers

VW Beetle Europa Bumpers

1977, German 


Sealed beam front fenders
With chrome strips and parts in the front hood
12 volt electronics
Big taillights


VERDICT:

I think the body of my 1973 German Standard Beetle itself is that of an Econo Beetle (painted vent window frames and short headliner) but is customized to look like a US De Luxe version (1300cc engine, single port, Europa bumpers, chrome trimmings, big taillights, 12 volt electronics, etc.)


I have a 1973 German Standard customized Econo Beetle.


PREVIOUS RELATED POST:

My 1973 VW RESTORATION: German vs. Brazilian Bug.

My 1973 VW RESTORATION: Standard vs. Super Beetle

My 1973 VOLKSWAGEN BEETLE RESTORATION- My Story a...


NEXT: 


Tags: , , , , , , , , , , , , , , , , , , , , , , , , , , , , , , , , , , , , , ,